
- Installation
- Use
- Comment Form
- Anti-Spam
- Notification
- Login & Social Integrations
- Profile Extensions Integrations
- Configuration
- Module & Add-ons
- Advanced
- Developer
Installation
1. Requirements
- Joomla version: 3 to 6
- PHP:
- PHP Extensions: ZIP Library
- PHP Extensions: GD Library
- PHP: [magic_quotes_gpc = Off]
2. Download & Install
Apply for new installations & upgrades. Before proceeding, always remember to BACKUP your site first.
Get the latest version of the JLex Comment at the download page: https://www.jlexart.com/downloads
At the admin section of your website, follow these steps:
- Joomla 3: Extension > Manage
- Joomla 4 to 6: System > Install > Extensions
Use
Integration with available extensions such as VirtueMart, K2...
- Visit the Add-ons page, find your extension and follow the instructions.
- If the extension is not on the list, please open the request HERE.
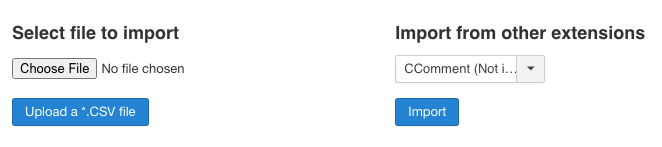
Data Import
You can import data from CSV files or directly from supported extensions, including:
- CComment
- JComment
- K2
- Komento
- VirtueMart
With CSV, make sure the file contains enough of the basic fields:
- Comment
- Author Name
- Date
Once you have the CSV file, GOTO JLex Comment > Import/Migrators > Select File and follow the instructions OR import data directly from the above extensions.
Create your own comments page
- Admin Site > Menus > Main Menus > Add New Menu Item
- At Menu Item Type > Select > JLex Comment > Discussion
- Fill Menu Name and Alias > Save
You want to create a review page but through the module? See here.
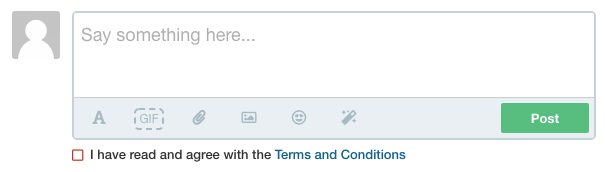
Comment Form
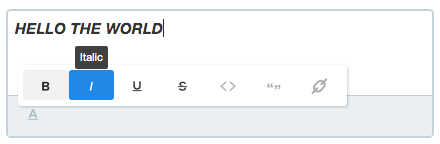
Formatted Text
By enabling this feature, users can use popular text formats such as: Bold; Italic; Underline; Strike; Insert Link; Quote; Code
GOTO Settings > Layout > Comment Form > Format Text: Yes.
Upload Photos & Files
This feature helps users to attach photos and files to their comments.
To enable this feature, GOTO Settings > Layout > Comment Form > Media: Yes.
You also turn on it in ACL Manage (Media: Upload Files). See HERE.
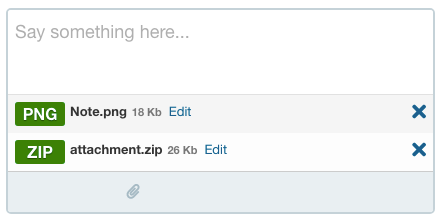
Related parameters:
| Property | Default Value | Description |
|---|---|---|
| File Extensions | jpg,jpeg,png,gif,zip,rar | File extension allowed. Separate each other with commas and no spaces. |
| Max File Size (Mb) | 2 | The maximum size of the file that can be uploaded. |
| Attachment path | media/jcm | The directory where the upload file is stored. |
| Photo Max size | 1000 | The system will resize the image if its width or height exceeds this value. |
Location Sharing
Attach your location to the comments. GOTO Settings > Layout > Comment Form > Location: Enable
You also need a Google Map Key for the feature to work.

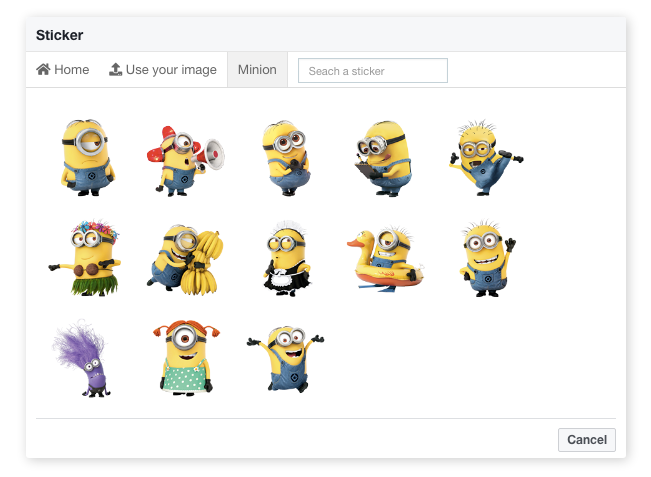
Sticker
Insert sticker into comments. The sticker can be available (added by admin) or added by the user.
GOTO Settings > Layout > Comment Form > Sticker: Enable
In order to add new sticker, from admin area, GOTO Sticker > New, select your file and save it.
Users can also use their photo as a sticker if you activate it: Settings > Layout > Comment Form > Sticker Photo: Yes.
Comment Style
! You need to know the CSS code to start this section. This feature is used to add style to comments.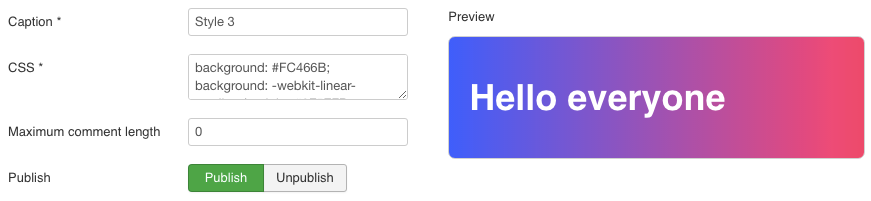
GOTO Settings > Layout > Comment Form > Comment Style: Yes.
GOTO Style to add new and manage these styles.

Emoji
Emoji Picker use to insert ideograms and smileys into comment
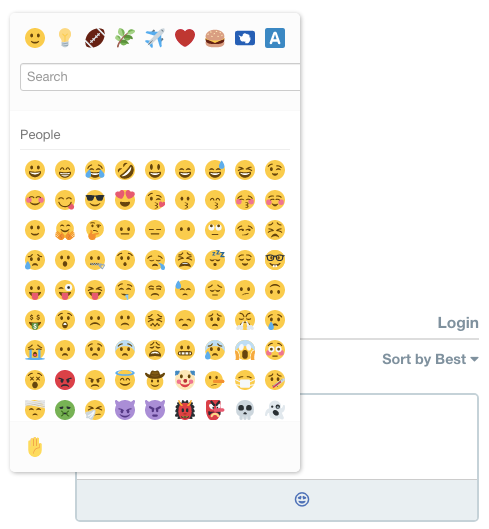
To enable it, GOTO Settings > Layout > Comment Form > Emoji: Enable. This extension use Twemoji OpenSource to render these emoji.
GIPHY
Insert GIF image from GIPHY gallery into comment.
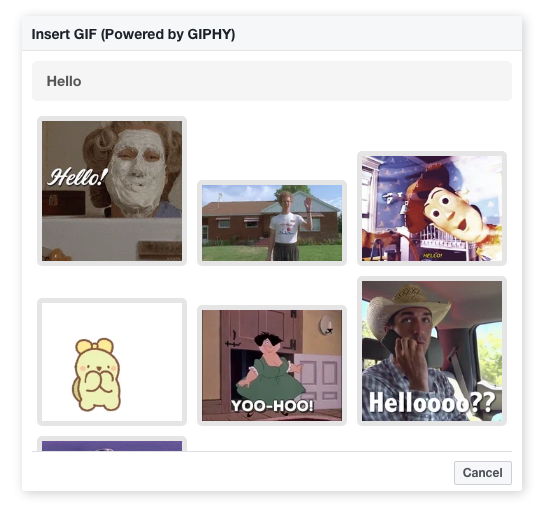
To enable it, you need:
- GOTO Settings > Layout > Giphy: Yes
- Visit page developers.giphy.com to get key and fill it in the Giphy API key field.
Anti-Spam
Captcha
CAPTCHAs provide challenges that are difficult for computers to perform but relatively easy for humans. Used to limit spam.
reCaptcha See instructions for installation and usage in the Add-ons section.
Image Captcha Here
Blacklist
Tools to block members or guests (by IP address)
GOTO Blacklist > New to add new row:

Anyone on this list cannot write comment.
Report
The tool recognizes feedback on reviews or comments that are not positive.
Activate this feature by going to Settings > Permission > Report a Comment
Notification
Administrator
| Property | Value | Default Value |
|---|---|---|
| Email
Email address to receive notifications |
Blank | Blank |
| Include reply | Yes | No | No |
| Sending Method | Immediately | CronJob | CronJob |
| Begin Date | Date to begin send notification - Just apply for CronJob Sending Method. | Blank |
| Quick Moderation
View, delete or publish comments from email. |
Yes | No | Yes |
| Send an Email to owner
Send email to user who write a comment |
Yes | No | No |
User
| Property | Value | Default Value |
|---|---|---|
| When mention
When someone mentioned in the comment |
Yes | No | Yes |
| When replied
Get notified when someone replies to your comment |
Yes | No | Yes |
| Alert front-end
Send a notification to profile page |
Enable | Disable | Disable |
CronJob Setup
To enable notification for members, or admin (if you choose CronJob) you must add the CronJob command in the notifications section to CronTab.
Most Hosting or Server UI provide this tool.
Notice: If you are using Akeeba Admin Tools, please open .htaccess file and remove the line contain:
SetEnvIf user-agent "(?i:Wget)" stayout=1
Login & Social Integrations
Login
The default login system of JLex Commeny is a dialog box.
You can switch this login method to a custom URL address.
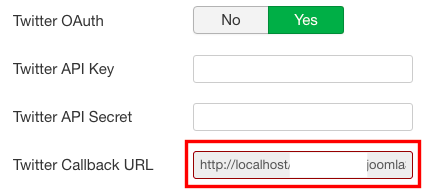
GOTO Settings > General > Login Type: Dialog | URL

Note: If you want the comments to be enable only to guests, you need GOTO Settings > General > Login Site: No | SignUp: No
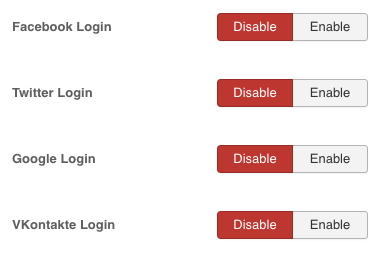
Social Integrations
GOTO Configuration > User to get started:
- Visit https://developers.facebook.com/
- Login to Facebook
- Click My Apps in top right of screen
- Click Create App
- Choose Build Connected Experiences
- Fill App Display Name and App Contact Email > Click Create App
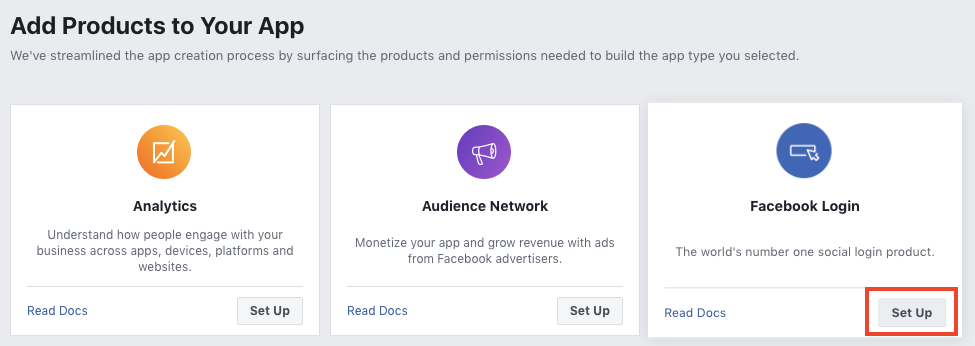
- At Products Page , select Facebook Login > Setup
- In the sidebar > Facebook Login > Settings

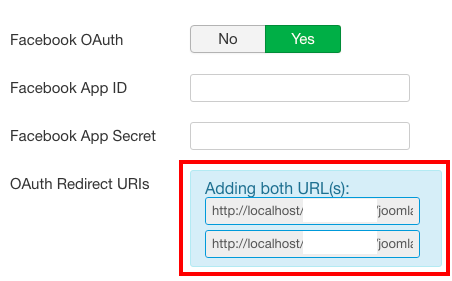
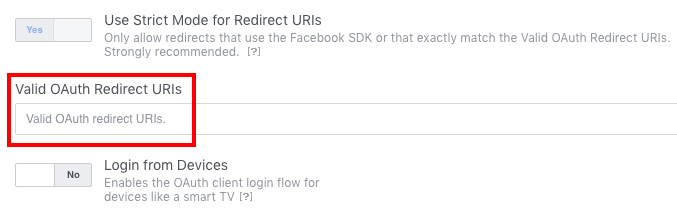
- Add the value taken from Admin Site (JLex Comment Settings > General > Facebook Login > OAuth Redirect URIs) to Valid OAuth Redirect URIs of Facebook settings > Save Changes
→ 
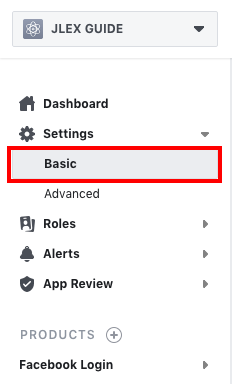
- From Sidebar > Settings > Basic > Fill all informations
- Switch In developement to Live mode

- Copy App ID and App Secret to JLex Comments Settings.
- Visit https://console.cloud.google.com/
- Login to Google
- Select Manage Project > New Project > Fill Project Name > Create
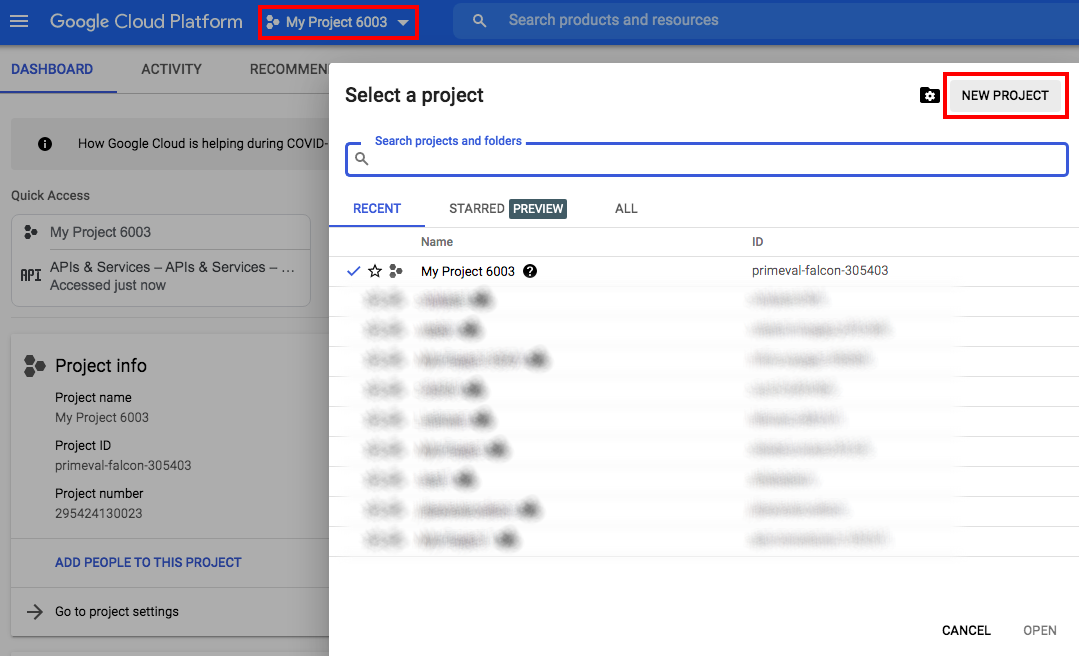
- Wait for the project creation process to complete > Select newly created project to continue
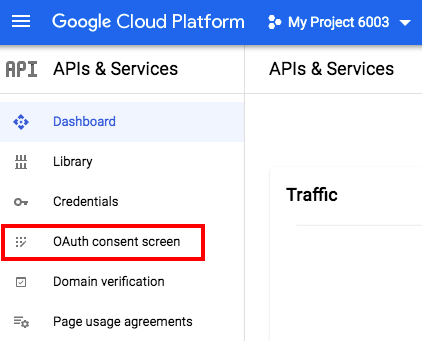
- Navigation Menu > APIs & Service > Credentials > OAuth consent screen
- Set User Type is External
- Fill out all required information > Save and Continue
- Click Add or Remove Scopes
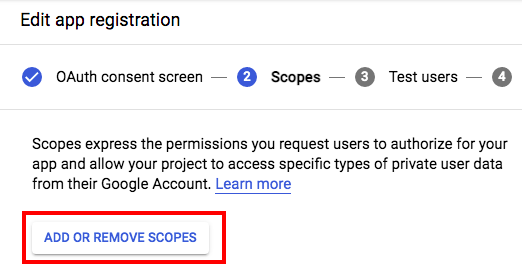
- Select userinfo.email and userinfo.profile > Update
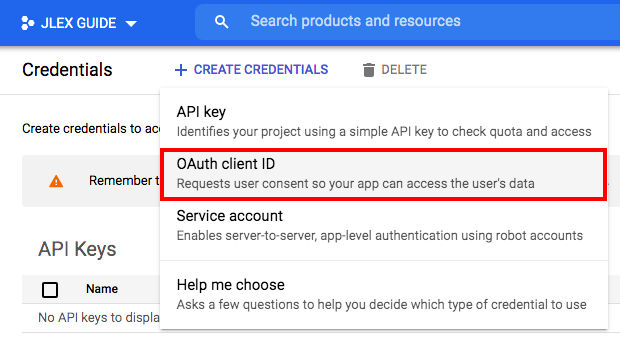
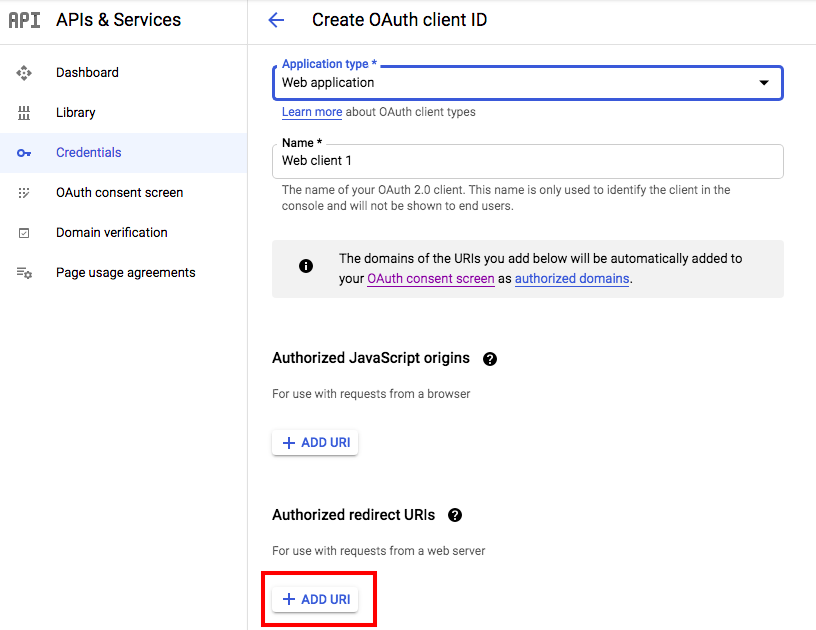
- From Sidebar > Credentials > Create Credentials > OAuth Client ID
- Select Application type is Web application
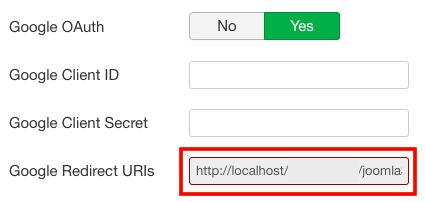
- Add the value to URIs in Authorized redirect URIs. (This value is taken from JLex Comment Settings > General > Google Login > Google Redirect URIs )
→ 
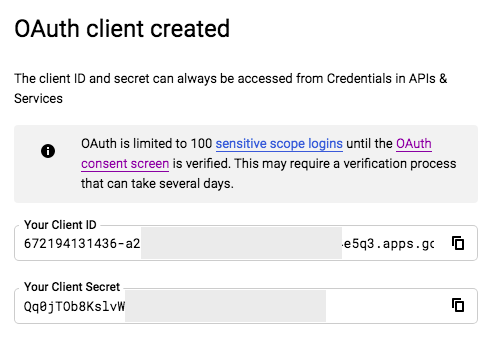
- Click Create button to complete
- Copy Your Client ID, Your Client Secret to JLex Comment Settings
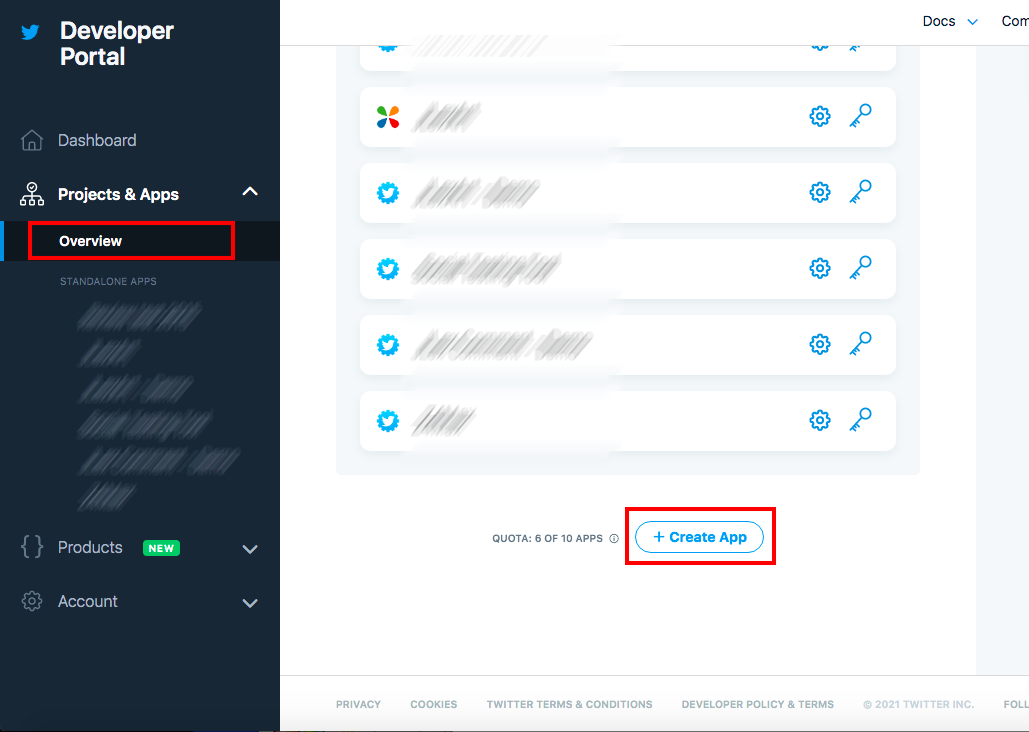
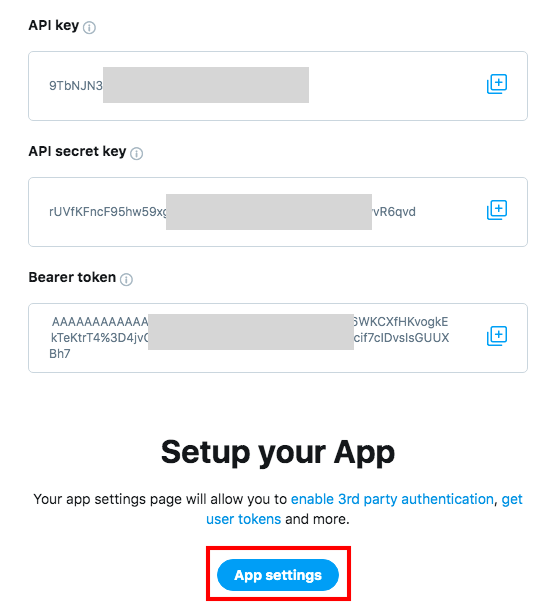
- Visit https://developer.twitter.com/en/portal/dashboard
- Login to Twitter
- From the sidevar > Projects & Apps > Overview > Create App
- Enter App Name
- Copy App key and API secret key to JLex Comment Configuration
- From Twitter App > Click App Settings
- Scroll page to Authentication settings > Edit
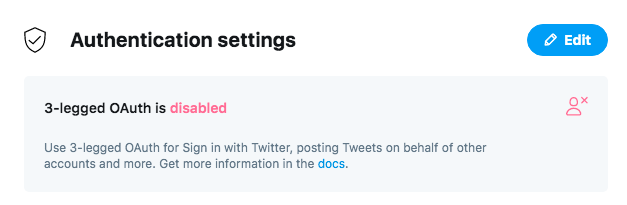
- Enable Enable 3-legged OAuth
- Add the value to Callback URLs - This value taken from JLex Comment Settings > General > Twitter Login > Twitter Callback URLs
→ 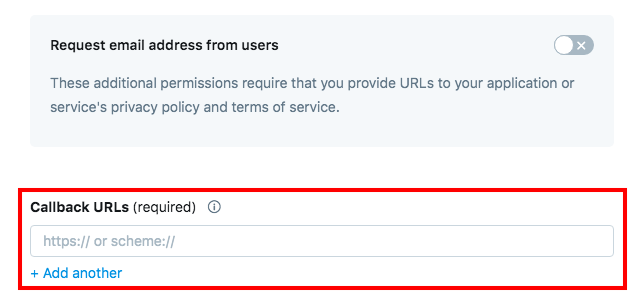
- Enter Website URL > Save
VKontakte
- Visit https://vk.com/apps?act=manage
- Login to VKontakte
- Click Create button
- Fill out all required information
- After the application is successfully created, from sidebar of app page > Settings
- Copy Secure key and Service token to JLex Comment Settings
Profile Extensions Integrations
JLex Comment supports sync of avatar & link to profile with the following extensions:
- JLex Review
- EasySocial
- EasyBlog
- EasyDiscuss
- EasyProfile
- K2
- Community Builder
- Gravatar (Avatar only)
- JomSocial
- Kunena
GOTO Settings > Layout > Profile Integration to get started.
Configuration
Below are the main features. See full in the admin section of The Demo Site.
| Property | Description |
|---|---|
| Template | Default(Light) | Dark |
| Load Default CSS | |
| Font Awesome Icon | Support Font Awesome 4 & 5 |
| RSS | Enable web feed that allows users and applications to access updates to websites in a standardized, computer-readable format. |
| Author Avatar | Show/Hide user avatar |
| Author Name | Use Username or Name as a nickname |
| People listing | Displays a list of users interacting in a conversation |
| Comment Date | Show the date of the comment. |
| Date Format | Time Ago | m/d/Y | d/m/Y | ...ect |
| Collapse | Collapse comment if its content is too long. |
| Format link | Auto wrap a link in Comment content |
| Sharing | Share comment to social network platform |
| Form position | Top or bottom of the comment listing |
| Filter Bad Words | Yes | No |
| Filter by Language | Show only comments with the current language of the page. |
| Import/Export Setting | Backup or Recover JLex Comment settings. |
Module & Add-ons
Download and See how to use Modules & Addons at page jlexart.com/addons/jlex-comment
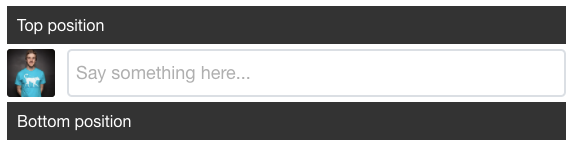
Module positions
JLex Comment support three positions to embed modules:
- jcm-form-top
- jcm-form-bottom
The screenshot below is preview position:
Advanced
Roles
Used to label a group of members or meet an optional condition.
Access Roles to add new and manage:
| Input | Output |
|---|---|
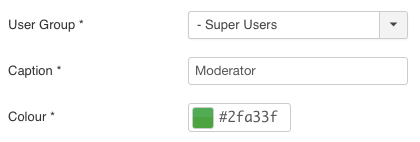 |
 |
Reaction
You can replace the button interact with comments such as Up/Down by the reaction buttons.
GOTO Settings > Layout > Voting Type: Reaction. Then add reaction button in the Reaction data field.
| Input | Output |
|---|---|
 |
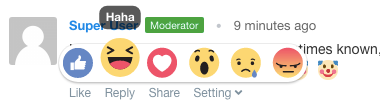 |
Terms/Rules
Remind users of the terms of use before they post a comment.
To enable it, GOTO Settings > Layout > Comment Rule: Yes.
Access Control List Manage
Used to control permissions according to groups of users. GOTO Settings > Permission to get started
| User | Admin |
|---|---|
| Write/Edit/Delete Comment | Edit/Delete Any Comment |
| Media: Upload Files | Publish/UnPublish Any Comment |
| Download File | Show author IP/Email address |
| Mention | Featured/UnFeatured Any Comemnt |
| Vote a Comment | See author's email or IP address |
| Report Comment | |
| Subscribe discussion | |
| Automatically Publish Comment |
Developer
Replacer
Using to replace a structured string in comment.
Example: You want to preview image based link attached in review
GOTO JLex Comment > Replacer > New to add new replacement item. Fill form as image below:
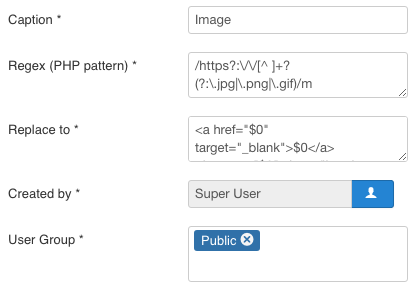
Then, select User Group you want apply and save this form.
Synchronization
This part will solve some issues:
- Sync title & url of item in JLex Comment when it is changed by parent extension
- Make something when the number comment of item is changed
- Author of item will be subscribe automatically, and they will receive a nofitication when someone post a new review.
You have integrated JLex Comment with K2, and now you want solve above issues.
First, you need access to Synchronization menu in back-end. Click "New" button to go Sync form.
At here, you will see 3 corresponding items to solve the above problems.
- Update entry details
- Callback when number comemnt of item is changed
- The author keeps track of their posts
Firstly, you need set value of Object field is k2 (lower).
Update Entry Details
Global variable: $object_id. In this part, you need write a program to get title & link of K2 item. The ID of K2 item is $object_id
Return an array include two properties title and url, return deleted (string) if item not found.
Callback when number comment of item is changed
If the number comment of item is changed and you want make something (eg: update value of a field of database). Global variable include $object_id, $comment_count, $all_comment_count. The ID of K2 item is $object_id
The author keeps track of their posts
When author post an article, you need click to subscribe button to get latest comment about this article. It will better if system auto add this user to subscription list.
In order to do that, you need enable The author keeps track of their posts. In Code editor, you need write a program to get USERID of author based on ID of item (here is $object_id).
Templates
Install New Themes
In order to create new theme, you should do following steps:
- Go to directory: components/com_jlexcomment/themes
- Copy default forder and rename by new name.
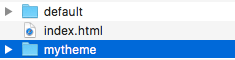
- Now, you can custom your theme by modify file in this folder
- Last, Go to Settings > General > Template > Select your theme
Template Overrider
JLex Comment sub-templates extend the templating capabilities of Joomla! by allowing the creation of multiple, named sets of view overrides for JLex Comment.
JLex Comment component sub-templates are created by copying the contents of components/com_jlexcomment/themes to /templates/DEFAULTTEMPLATE/html/com_jlexcomment/, where DEFAULTTEMPLATE is the name of your site's default template.
Each template pack will include:
- - default.php
- - default_comment.php
- - default_comment_flex.php
- - default_comments.php
- - default_form.php
- - default_header.php
- - style.css (Option)
To create a new JLex Comment component sub-temple, make a copy of /templates/DEFAULTTEMPLATE/html/com_jlexcomment/default and rename it appropriately, such as /templates/DEFAULTTEMPLATE/html/com_jlexcomment/mytheme (or keep is "default"). The files in this new sub-template can now be customized as needed.
Last, make sure that you set new theme in Setting.
Email Template
All email templates stored in path administrator/components/com_jlexcomment/libraries/email_templates
This folder include 6 files:
- admin.php Notification for admin when have a new comment
- mention.php Notifications for users mentioned in comments
- subscription.php Notifications for user when item that they subscribed have a new comment
- subscriber_verify.php Confirm user's email address when they subscribe
- user.php Send Thanks Email to User who wroten comment
- body.php The HTML page use to send email.
You can clone this folder to create new email template but must enter new directory in JLex Comment > Settings > Advanced > Email Template Path.
Integration Into Other Extensions
Same as popular components like as JLex Review, JComments, Komento... JLex Comment allow you integrate it to your component. It contain two parts:
Comment Counter
Using to display number comment of item
<?php
$loader = JPATH_ROOT . '/components/com_jlexcomment/load.php';
if(file_exists($loader))
{
    require_once $loader;
    echo JLexCommentLoader::count_cm($extension, $id);
}
Parameters:
- $extension: (type:string) - name of component (without com_ prefix) : k2, virtuemart or easyblog ....
- $id: (type:integer} - ID of item (maybe is article, blog item...)
Example:
<?php
$loader = JPATH_ROOT . '/components/com_jlexcomment/load.php';
if(file_exists( $loader ))
{
    require_once $loader;
    echo JLexCommentLoader::count_cm('k2', $item->id);
}
Comment Listing & Form
Put code bellow where you want show full comment page:
<?php
$loader = JPATH_ROOT . '/components/com_jlexcomment/load.php';
if(file_exists($loader))
{
    require_once $loader;
    echo JLexCommentLoader::init($extension, $id, $title="" , $url=null );
}
Parameters:
- $title (type:string) - name of reviewed item. If this param is blank, the JLex Comment will find title automatically
- $extension (type:string) - name of component (without com_ prefix) : k2, virtuemart or easyblog ....
- $id (type:integer} - ID of item (maybe is article, blog item...)
- $url: (type:string | default:null} - Url to comment item. If this param is blank, the JLex Comment will find url automatically
<?php
$loader = JPATH_ROOT . '/components/com_jlexcomment/load.php';
if (file_exists ( $loader )) {
    require_once $loader;
    echo JLexCommentLoader::init ( 'k2', $this->item->id , $this->item->title );
}
TOP